How to solve the cube
Information about the cube
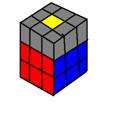
The cube is solved in layers, starting with the white face, then the middle layer, and then the last layer (yellow),


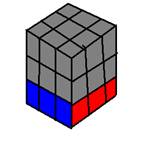
1st Layer Middle Layer Last Layer
The centre pieces on the cube are always fixed relative to each other, white is always going to be opposite yellow and
red is always going to be opposite orange and blue opposite green.
There are three different types of pieces,
1. The centre pieces, with one sticker
2. The edge pieces, with two stickers on it
3. The corner pieces, with three stickers on it
It is important not to look at a piece with white on it and call it a white piece, look at the other colours on it, if it is an edge
piece and it has white and red on it, then it is the white and red piece, the only white and red piece, so the only place for it
is in between the red and white centres.

If the piece has 3 colours on it, white blue and red, then it once again is the one and only white blue and red piece and the only
place for it is in between the red white and blue centres,
So the 54 colours on your cube have been shrunk down to only 26 pieces,
Notation
Each side or face of the cube has a name abbreviated to a letter,
U = Top or upper face F = Front Face L = Left Face
D = Down or bottom face B = Back face R = Right face

In the solution I am going to be using the word algorithm a lot, this doesn’t mean it has anything to do with maths, an algorithm is
just a sequence of moves,
For example: U2 D2 L2 R2 F2 B2
A letter means turn that face clockwise 90 degrees
An apostrophe after a letter means turn it anti clockwise, example: U’
If you are unclear as to which way to turn it then look at the face and do it, B and D can be confusing
A 2 after the letter, U2, means turn it 180 degrees
The F in the illustrations indicates which face is the front for that section
It is important to keep the F face the same throughout the algorithm, if the F is on the blue centre then blue will be the F face for
that algorithm. Hold it with blue facing you at all times (unless your checking which way a face should be turned).
On of the more common mistakes made while learning is starting with the wrong F face, or accidently changing the F halfway through
the algorithm.
Try the above algorithm on your cube, and see what happens, re do it to put your cube back to normal.
Before trying to solve the cube please read the whole tutorial the whole way through, and then while solving, read each section once
again before starting it.
The Solution
1st layer
Step one; The Cross
The first thing to do is form a cross on the white face, this is pretty much common sense, but there are some techniques to help.
The best way to approach it is by finding a piece, then find where it’s suppose to go. Start with the white and red edge, find it, and put
it on the bottom layer, then twist the bottom layer until its under the red centre. Then turn the red centre 180 degrees so that it forms part of the cross.


The Cross If you a piece is backwards and it looks like this,
then do the alg: F’ U L’ U’
Note the F in the red centre, this implies that red is the
Front face for this whole algorithm,
Step two corners,
Place the correct corner piece, In this case the red white and blue piece, directly under the place it has to go, If the piece is in the correct
place but just turned funny that’s fine too.
For example, find the red white and blue corner. There are three places it can be.
1. The bottom layer, so simply twist the bottom layer until its between the red and white centres.
2. It’ll be in the correct place but just turned funny.
3. It’ll be in the top layer, but not the correct place. Just turn either of the faces that its attached to 90 degrees so it moves down to
4. the bottom layer, twist the bottom layer twice (180 degrees) and then put the face that you moved down back up (to reform your cross).
5. The piece is then in the bottom layer and your back to option one.
Option 1 Option 2 Option 3


Do the
alg: R’ D’ R D and remember where the F is. (blue!!)
The alg will
have to be done between 1 and 5 times for the piece to go in correctly,
Do it to all
four corners of your cube and then it should look like this
The middle
layer
The middle layer
is the easyiest layer, there are two algoritms and only four pieces to put in
the correct place,
Turn the
whole cube upside down so that yellow is now the top or U,
This is how
its going to be until completed.
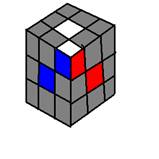
Position the
correct edge piece above where it has to go like this;
Situation 1
The edge
piece wants to move down and to the right,
 then
do the alg: U R U’ R’ U’ F’ U F
then
do the alg: U R U’ R’ U’ F’ U F
Don’t forget to check which your face is.
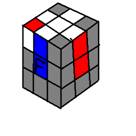
Situation 2
The edge piece wants to move down and to the left
 do the alg:
U’ F’ U F U R U’ R’
do the alg:
U’ F’ U F U R U’ R’
Sometimes the piece you are looking for is stuck and in the wrong place, then you have to put one of the last layer edges
(one with yellow on it) in to ‘knock’ the piece you want out, so if the red and blue edge, is in between the blue and orange centres,
find a last layer edge (yellow) in the upper layer, pretend its orange and blue, and put it in to free up the blue and red,
Or even worse the red and blue piece is in between the red and blue centres but it’s the wrong way round, again, just put a last layer
edge in its place, free it up, and put it back in the correct way,
Use the above algorithms to put all 4 middle layer edges in place.
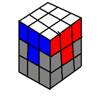
Now loads of your cube is done and it should look like this
The Last layer,
The last layer is the most difficult and complex, if you make a mistake in an algorithm then you can find yourself being sent back to
the start, but have faith, and persevere and you will solve it,
Step one,
The yellow cross
After completing the 1st two layers the yellow face of your cube will have one of the following patterns on it, do the corresponding
alg to your pattern,
We are only dealing with the edge pieces now, ignore the corners,
The F face is always the one at the bottom in these pictures, and yellow is always up, U.
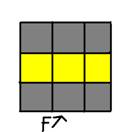
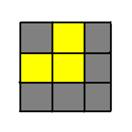
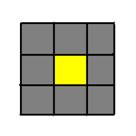
F R U R’ U’ F’ F U R U’ R’ F’ Do either of the alg, then re examine,
When you have the cross it is very unlikely that the second colour on each of the yellow edge pieces matches with the centre that its
next to, that doesn’t matter, as long as you have a yellow cross on top its fine, they get moved into the correct place later,
Step two,
Putting the corners in the correct place,
The goal of this step is to put the corners in the correct place but they don’t have to be turned the correct way round,
For example the red, blue and yellow piece could be in between the red, blue and yellow centres, but red could be on top, this is
ok for now, they will be turned round later,
You are guaranteed to have two in the correct place, either two next to each other, or two diagonally across the cube,
It may not appear so and you may have to twist the yellow face round a few times, but you will be able to get two in the right place.
The tick represents the ones in the correct place, the X represents the ones in the wrong place.
Again, remember where your F face is and line it up correctly.


L U’ R’ U L’ U’ R U2 or L U’ R’ U L’ U’ R U’
And then re examine and you will have two
In the correct place,
Remember in this step we are not trying to get all the yellows on top, just the corners in the correct place, but not spun round correctly,
spinning comes next,
Step 3
Flipping the corners around
There are 8 different options as to what your cube will look like on top, but there are two important ones, and luckily, only two algorithms
need be learned. If you don’t have one of the following pictures then do either of the algorithms and you should have them. If not try the
other one, you may go round in circles a bit you will start to notice patterns yourself and learn which algorithm to do to each of the 8 options.
But don’t worry about that for now, just pick one and hope for the best.
The two appear very similar but if you look closely the yellow dash around the outside represents the yellow sticker on the side of that piece.


R U R’ U R U2 R’ U2 or R’ U’ R U’ R’ U2 R U2
Your yellow face should now be complete, but again, don’t worry that the edges don’t match the centres.
Step 4
The last step,
By now your cube should be almost complete. The yellow face should be complete but either 3 or 4 of the last
layer edges should be in the wrong place. If they’re not then you’re done and you got lucky.
If you have 4 pieces wrong then you can chose either of the algorithms, do it, and then you will have three wrong,
these two algorithms are very similar, except the way you twist the U face decides whether you move the pieces in
a clockwise or anti clockwise direction,
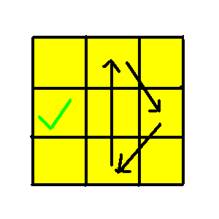
Put the edge piece that’s in the correct place on the left. Have a look at the piece closest to you; does it want to be
in the back face? Or the right face? The arrow in the picture denotes where the piece is going to move from and too.
The tick represents the one in the correct place.
Be careful with the B and B’ moves, turn the cube round and look at which way your twisting it.

R2 U’ F B’ R2 F’ B U’ R2 or R2 U F B’ R2
F’ B U R2
And your done.
The cube is finished,
Afters,
As you do the algoritms
again and again you will start to notice patterns in them, alot of them are
very similar.
You will also start to remember them without
even trying if you play with your cube enough and run through
this solution. You will also start to
understand the way the cube works and as a result start to spot little
shortcuts
and ways to make it that little bit quiker.
With this solution you
should be able to solve the cube in under a minute.
If you have any questions or get stuck you can email us at [email protected]
Hope you have fun,
Joe and John,